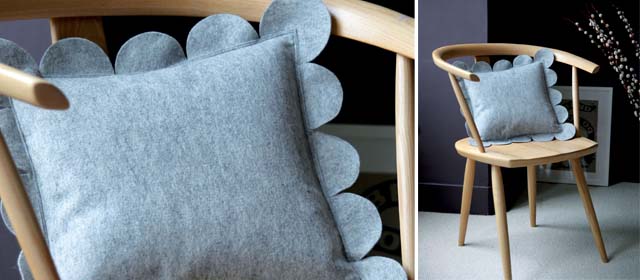
 This deliciously simple yet creative cushion features in Christine Leech’s new book, Felt Sew Good: 30 Simple & Stylish Felt Projects – and we have the pattern for you, below. See Christine’s felt windmill cushion tutorial too.
 Christine’s new book is a fabulous collection of ideas for one of the most versatile fabrics in a crafter’s kit. The projects are truly gorgeous and deceptively simple, so much so that children as well as adults will have a lot of fun creating projects from this gem of a book.
Projects in the book include gifts for children, decorations, and projects for the home.
We’re thrilled to feature one of Christine’s gorgeous craft project’s, below.
Extracted with permission from Felt Sew Good by Christine Leech, published by Quadrille and distributed in NZ by Bookreps. RRP $29.99.
Scallop Cushion
Grey is such a versatile colour, it sits comfortably in a neutral colour scheme and adds sophistication to a bright one, and the scalloped trim adds a more playful edge. Several of these cushions in various colours would look great together.
Supplies:
Fabric scissors
1m x 50cm piece of grey marl felt
Matching sewing thread
35 x 35cm cushion pad
Makes 1
1. Cut one 35 x 35cm square for the front panel, two 35 x 21cm rectangles for the back panels and sixteen 8.5cm-diameter circles from the grey felt.
2. Place one of the back panels on your work surface and overlap the other back panel on top to create a 35 x 35cm square (it needs to be the same size as the front panel). Tack in place.
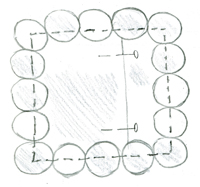
 3. Starting at one of the corners, pin the circles around the edges of the back panel. Cover each corner with a circle, lining up the centre point of the circle with the corner edge of the panel. Along each side and between each corner, pin three more of the circles. Line these up with the corner circles so that half of each circle overlaps with the back cover. Stitch all the way around the outside of the panel, about 5mm in from the outside edge. Remove the tacking.
4. Place the back panel on top of the front, with the backs of the circles enclosed between the two felt layers and line up. Sew all the way around the panels, about 5mm in from the outside edge.
5. Remove any remaining pins and carefully insert your cushion pad. Take care not to stretch the felt too much while doing this.
MORE CUSHION TUTORIALS
Check out Christine’s felt windmill cushion tutorial too.
 My Favourites


[…] Here’s a Modern Felt Pillow tutorial that is an excerpt from Felt Sew Good by Christine Leech. I reviewed this beautiful […]